
Photographing Your Furniture so that it actually sells it is one of the vital keys to achieve consumer trust and attract potential customers by just doing product photography properly. Product visualization is important for any business, but when it comes to selling then e-commerce has almost 93% of consumers that considers visual appearance drives their purchase decision.
So how does taking aesthetically pleasing photographs translates to sales? Well for a furniture company , sellers who want to earn some extra bucks or someone who wants to sell their pre-loved furniture then one thing which can guarantee a positive response is Photographing Your Furniture. By photographs we don’t mean taking random pictures but providing an overview like one is physically viewing the product.
Why Good Furniture Photography Matters
Evidence shows that photographs remain the vital key in generating sales while there are multiple ways of Photographing Your Furniture, but we have provided comprehensive steps so you can be a Pro and sell your furniture with just the following few steps.
Remember first impressions always count, especially when selling on online platforms. High-quality images make furniture look more presentable and desirable, Photographing Your Furniture with utmost efforts makes the furniture stand out from the crowd and consumers generally purchase products that contain pictures of design, finishing and imperfections with clarity as it builds trust.
Highlight its imperfection, key features that will make potential customers buy it, well-lit pictures will make your shots shared with their connections. Professional furniture photography increases the likelihood of customer traffic.
How To Photograph Furniture:
Now let’s actually look into How To photograph furniture? And some vital tips and tricks to master camera settings and some post-production instructions to photograph like a professional!
1. Choose the Right Location:
Start preparing your furniture and make sure no dust or decorative items are present on it. If your furniture requires some refinishing and you’re up for it then do it or just clean the furniture thoroughly, assemble if they require and we’re set to move on to the next step.
Select a well-lit room or large space with room to allow professional-quality photographs. If you’ve natural light coming in then it’s perfect but we can make it work with just by selecting a location that allows calmy clicking photographs without any distractions. Use a white backdrop made of paper of white fabric to make the furniture pop!
2. Use Proper Lighting:
If you’ve natural light coming in from windows then it’s all sorted. For most of us, we need to use some artificial lights to complement the product in front of the camera. Choose bright lights and top lights to highlight key areas of the furniture. Makes the furniture look more three-dimensional and provides in-depth textures.
Good lighting is undeniably the key factor for images to come out great. Use large light sources for a softer and even lighting while reducing any unwanted shadows and highlights.
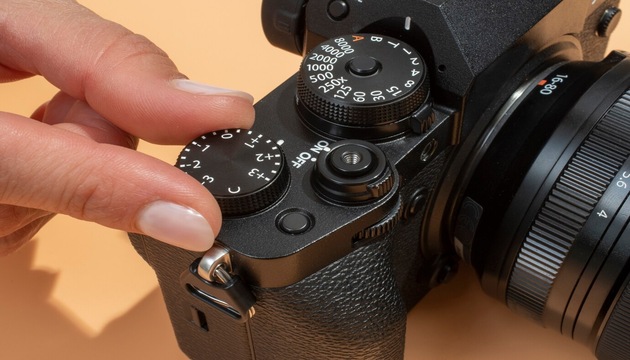
3. Select the Right Camera and Settings:
Placing the camera at the right angle can make all the difference. No one wants to see blurry images or high exposure photographs as they don’t view the actual colors, design and textures. With adjusting camera settings, ensuring stable angle and post-production can become a game-changer.
Capturing professional furniture photographs requires attention-to-detail and some setting adjustments that can level-up the overall appearance of the product. Grab your camera or ask your friend to lend it to you. Aperture Priority mode will work best as the shutter speed can adjust automatically, for distance shots f/8 will work best while for close-ups try switching between f/2.8 to f/4.
Keep shutter speed slower at 1/10 to 1/60 seconds and ISO between 100-200 to achieve high-quality images. Lens also matters, use 24-35mm to capture entire furniture while for close-ups 50mm or 85mm will work.
Adjust the settings according to your desired lighting, space and camera as they play an important role in providing the accurate perspective of the furniture. Use camera distance for full overview with some close-up shots. Shoot with different angles for a 360-degree spin look.
4. Use a Tripod for Stability:
Photographing Your Furniture isn’t just placing the furniture with adequate lights but consistency and stability are also crucial in obtaining high-quality furniture images that actually sell. A tripod can resolve your worries as it stabilizes the camera and stays fixed to deliver consistent shots with the same lighting, exposure and angle.
Provides a stable base for precise adjustments and ensures proper perspective is captured. Ideal when you want to capture multiple furniture images as you can just change directions of the furniture without having the need to adjust camera settings and angles. Delivers professional-like quality and builds trust among potential customers.
Also Read: How To Properly Clean And Maintain Your Used Furniture?
5. Capture Multiple Angles:
Capturing furniture from multiple angles portrays a genuine and good-quality product. Products with multiple shots and angles deliver 360-degree perspective and highlight all the features, textures and designs with clear and aesthetic pictures.
Click multiple angles from a distance for an overview about the product and some close-up shots to ensure each and every detail can be seen just by looking at the image. Allows you to showcase its features and textures without any blur or shakiness.
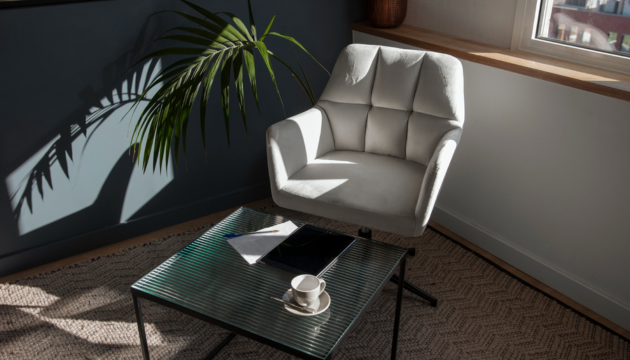
6. Stage Your Furniture:
Staging also makes all the difference. Buyers want to quickly get an idea about how the furniture will look in their home just by looking at the images. Proper staging can create the emotional connection within seconds. Staging basically means to rearrange or redecorate the furniture for some stunning clicks.
Clean the furniture thoroughly and if it requires minimal repairing such as loose screws or scratches done perfect them. Place your furniture with white backdrop or neutral background to avoid distraction and furniture can be in focus. Don’t over decorate the furniture as it might distract the overall look, just some cushions and a throw will do the job.
7. Edit and Enhance Your Photos:
Post-processing is as important as other steps, determining the final look that will be presented in front of a vast audience hence requires a certain amount of time to even to what is left undone. Use professional tools such as Adobe Lightroom or free tools such as Canva.
Import all the photos and select the one that you think will boost sales. Straight lines in every image and crop unnecessary space. Avoid too much color correction as camera, lighting and staging has already done much of the work. Adjust white balance or slightly brighten if the images require. Add final touches and make sure each set of images of furniture are of the same editing and theme for a unified look.
8. Maintain Consistency in Your Photos:
Keep all pictures consistent with the help of a tripod that’ll provide more stability. For images to look professional, it’s essential to keep the same set of angles throughout the product shoot. Use standard setup for every shot, same background, lighting, setting, camera angle and spacing to make the images look consistent and in-sync.
Editing also helps in maintaining consistency by applying edits across images and straightening lines. Allows you to achieve higher traffic and better trust from customers as every small detail counts.
Also Read: How To Choose The Right Used Furniture For Your Apartment?
9. Optimize Your Images for Online Listings:
Another key aspect to put out pictures that look desirable and have high chances of selling quickly is to optimize images worthy to attract the required traffic. Analyze the requirements of the platform you’re going to list your products on to. Check other sellers and how they post their furniture.
With consistent angles, colors, brightness and responsive images, helps to reach a wider audience. Apply all the above steps to make the pictures optimize for online listings.
10. Test and Improve:
All the essence of product visualization lies in trial and error as with every passing minute, theme, aesthetic and user preferences change. Ask your team members or close family and friends to review your pictures and provide insights then edit and improve images.
One more step you should take is to list one Furniture shoot and wait for customer reviews and track the type of response you are receiving, queries, traffic all can provide in-depth insights about the do’s and don’ts for the next shoot.
Conclusion:
The world has shifted to e-commerce and about 93% of the sales are generated when customers view an appealing image of the product but the question remains, How to take furniture photos?. Photograph furniture for your store or even if you’re selling furniture on online platforms with our step-by-step guide to achieve professional-like high quality Furniture shoot that actually sell.